
Some content on this page was disabled on July 3, 2023 as a result of a DMCA takedown notice from Guru99 Tech Pvt Ltd. You can learn more about the DMCA here:
Tag: Selenium
Automation using interface – right way
In this article we will see right way to create automation scripts. In general, if you look at any business solution for a problem statement, you can find two parts:
- Fixed
- Variable
The fixed part is some kind of boilerplate or constant declaration code, but when we use this design pattern we actually take care of the variable part.
All design patterns are discovered to maintain variable parts in an efficient way, so that the application welcomes changes without breaking. If your code is not flexible with future enhancements or changes, then your code is not up to the mark.
The question is, in Java, how judiciously can you maintain your variable parts?
To answer that, we can say variable parts are different ways that an outcome can be achieved, and the system must be ready to accept them all. More specifically, we know the type of the operation (say, “display functionality”, but it can have many implementations (maybe it is a projector or monitor). Most importantly, requirements in software development are to meet clients’ ever-changing needs. So I can say functionality is constant, but its implementation can change anytime based on the client, so always design based on a contract rather than an implementation.
Let’s take an example. A computer monitor is designed for display purposes. So I can say the computer is a product and the computer monitor is a part or module of the computer which is responsible for display operation.
Now, later on, client needs change and now they want to display on a projector.
So if our solution is not capable of welcoming this need, it will be nothing but a waste of a product.
According to new needs, what we can analyse is it will perform the same operation, display, but the module should change from computer monitor to projector.
The display module of a computer should be flexible, so we can change it easily, or we can change it dynamically (at runtime). We can say the display module is like a strategy, and a client can change the strategy at any time. Technically, the display is a function or contract, but it can have multiple implementations, so it’s better to create this contract as an interface, and every implementation will provide its own display mechanism so at runtime, the Computer can call it.
So our Java solution looks like the following:
interface displayModule
{
public void display();
}
public class Monitor implements displayModule
{
public void display()
{
System.out.println(“Display through Monitor”);
}
}
public class Projector implements displayModule
{
public void display()
{
System.out.println(“Display through projector”);
}
}
public class Computer
{
displayModule dm;// programming through interface as variable part
public void setDisplayModule(displayModule dm)
{
this.dm=dm;
}
public void display()
{
dm.display();
}
public static void main(String args[])
{
Computer cm =new Computer();
displayModule dm = new Monitor();
displayModule dm1 = new Projector();
cm. setDisplayModule(dm);
cm. display();
cm. setDisplayModule(dm1);
cm. display();
}
}
Output:
Display through Monitor
Display through projector.
Look the implemented solution: we know Display Module should be flexible and we know the problem statement is display Operation, but in the future, the client may change the display operation style. One thing is for sure: computer should have a display module, but we don’t know what that piece of equipment will be.
So we create an interface called displayModule, and all display equipment must implement that interface and provide its own implementation of the display operation.
In the computer class here I create a has-A relation called displayModule so that the display module can change frequently as per the client’s needs, so we always make this strategy as abstract or high-level as possible so we can change it on the fly with actual implementation.
Remember to always code through an interface so you can change your strategy at runtime with actual implementation. Figure out the variable parts of your problem statement and make it abstract so we can change strategy further.
Apache POI – reading and writing data in XLSX file
Because of huge popularity of MS office products you often need to support Microsoft office format such as word, Excel, PowerPoint. Since JDK doesn’t provide direct API to read and write Microsoft Excel and Word document, you have to rely on third party library to do your job. Fortunately there are couple of open source library exists to read and write Microsoft Office XLS and XLSX file format, Apache POI is the best one. It is widely used, has strong community support.
Below is the maven dependency for Apache POI API if you use maven in your project.
<dependency> <groupId>org.apache.poi</groupId> <artifactId>poi</artifactId> <version>3.9</version></dependency> |
Some useful POI classes
Apache POI main classes usually start with either HSSF, XSSF or SXSSF.
- HSSF is the POI Project’s pure Java implementation of the Excel ’97(-2007) file format. e.g. HSSFWorkbook,HSSFSheet.
- XSSF is the POI Project’s pure Java implementation of the Excel 2007 OOXML (.xlsx) file format. e.g.XSSFWorkbook, XSSFSheet.
- SXSSF (since 3.8-beta3) is an API-compatible streaming extension of XSSF to be used when very large spreadsheets have to be produced, and heap space is limited. e.g. SXSSFWorkbook, SXSSFSheet. SXSSF achieves its low memory footprint by limiting access to the rows that are within a sliding window, while XSSF gives access to all rows in the document.
Apart from above classes, Row and Cell are used to interact with a particular row and a particular cell in excel sheet.
Another useful class FormulaEvaluator is used to evaluate the formula cells in excel sheet.
A wide range of classes like CellStyle, BuiltinFormats, ComparisonOperator, ConditionalFormattingRule,FontFormatting, IndexedColors, PatternFormatting, SheetConditionalFormatting etc. are used when you have to add formatting in a sheet, mostly based on some rules.
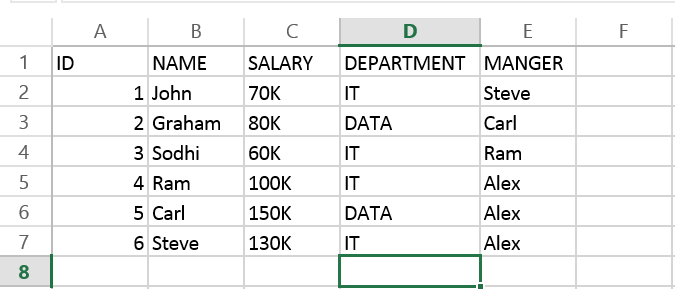
Here is how our sample Excel 2013 File look like, remember this is saved in .xlsx format.
Writing an excel file
Writing a file using POI is very simple and involve following steps:
- Create a workbook
- Create a sheet in workbook
- Create a row in sheet
- Add cells in sheet
- Repeat step 3 and 4 to write more data
package com.developerintest.demo.poi;//import statementspublic class WriteExcelDemo { public static void main(String[] args) { //Blank workbook XSSFWorkbook workbook = new XSSFWorkbook(); //Create a blank sheet XSSFSheet sheet = workbook.createSheet("Employee Data"); //This data needs to be written (Object[]) Map<String, Object[]> data = new TreeMap<String, Object[]>(); data.put("1", new Object[] {"ID", "NAME", "LASTNAME"}); data.put("2", new Object[] {1, "Amit", "Shukla"}); data.put("3", new Object[] {2, "Lokesh", "Gupta"}); data.put("4", new Object[] {3, "John", "Adwards"}); data.put("5", new Object[] {4, "Brian", "Schultz"}); //Iterate over data and write to sheet Set<String> keyset = data.keySet(); int rownum = 0; for (String key : keyset) { Row row = sheet.createRow(rownum++); Object [] objArr = data.get(key); int cellnum = 0; for (Object obj : objArr) { Cell cell = row.createCell(cellnum++); if(obj instanceof String) cell.setCellValue((String)obj); else if(obj instanceof Integer) cell.setCellValue((Integer)obj); } } try { //Write the workbook in file system FileOutputStream out = new FileOutputStream(new File("developerintest_demo.xlsx")); workbook.write(out); out.close(); System.out.println("developerintest_demo.xlsx written successfully on disk."); } catch (Exception e) { e.printStackTrace(); } }} |

Reading an excel file
- Create workbook instance from excel sheet
- Get to the desired sheet
- Increment row number
- iterate over all cells in a row
- repeat step 3 and 4 until all data is read
package com.developerintest.demo.poi;//import statementspublic class ReadExcelDemo { public static void main(String[] args) { try { FileInputStream file = new FileInputStream(new File("developerintest_demo.xlsx")); //Create Workbook instance holding reference to .xlsx file XSSFWorkbook workbook = new XSSFWorkbook(file); //Get first/desired sheet from the workbook XSSFSheet sheet = workbook.getSheetAt(0); //Iterate through each rows one by one Iterator<Row> rowIterator = sheet.iterator(); while (rowIterator.hasNext()) { Row row = rowIterator.next(); //For each row, iterate through all the columns Iterator<Cell> cellIterator = row.cellIterator(); while (cellIterator.hasNext()) { Cell cell = cellIterator.next(); //Check the cell type and format accordingly switch (cell.getCellType()) { case Cell.CELL_TYPE_NUMERIC: System.out.print(cell.getNumericCellValue() + "t"); break; case Cell.CELL_TYPE_STRING: System.out.print(cell.getStringCellValue() + "t"); break; } } System.out.println(""); } file.close(); } catch (Exception e) { e.printStackTrace(); } }}Output:ID NAME LASTNAME1.0 Amit Shukla 2.0 Lokesh Gupta 3.0 John Adwards 4.0 Brian Schultz |
Reading data from CSV file in Selenium framework
We can use Apache POI API to read the data from excel but if you come across any scenario for reading the data from CSV file then POI API will not be helpful.
For reading the CSV files we have opencsv API which is freely available and can be downloaded from here which can be used like in below code to read the data from CSV file.
Below is the maven dependency for Opencsv API :
<dependency><groupId>net.sf.opencsv</groupId>
<artifactId>opencsv</artifactId>
<version>2.3</version></dependency>package Developerintest; import java.io.FileReader; import java.io.IOException; import java.util.concurrent.TimeUnit; import org.openqa.selenium.By; import org.openqa.selenium.WebDriver; import org.openqa.selenium.firefox.FirefoxDriver; import org.testng.annotations.BeforeTest; import org.testng.annotations.Test; import com.opencsv.CSVReader; public class CSVReader { String PATH="C:\\Eclipse\\example.csv"; WebDriver driver; @BeforeTest public void setup() throws Exception { driver = new FirefoxDriver(); driver.manage().window().maximize(); driver.manage().timeouts().implicitlyWait(5, TimeUnit.SECONDS); driver.get("https://developerintest.wordpress.com/contact/"); } @Test public void csvDataRead() throws IOException{ CSVReader reader = new CSVReader(new FileReader(PATH)); String [] csvCell; while ((csvCell = reader.readNext()) != null) { String Name = csvCell[0]; String Email= csvCell[1]; String Website = csvCell[2];String Comment = csvCell[3];driver.findElement(By.xpath(".//*[@id='g4-name']")).sendKeys(Name); driver.findElement(By.xpath(".//*[@id='g4-email']")).sendKeys(Email); driver.findElement(By.xpath(".//*[@id='g4-website']")).sendKeys(Website); driver.findElement(By.xpath(".//*[@id='contact-form-comment-g4-comment']")).sendKeys(Comment); driver.findElement(By.xpath(".//*[@id='contact-form-4']/form/p/input[1]")).click(); driver.switchTo().alert().accept(); } } }
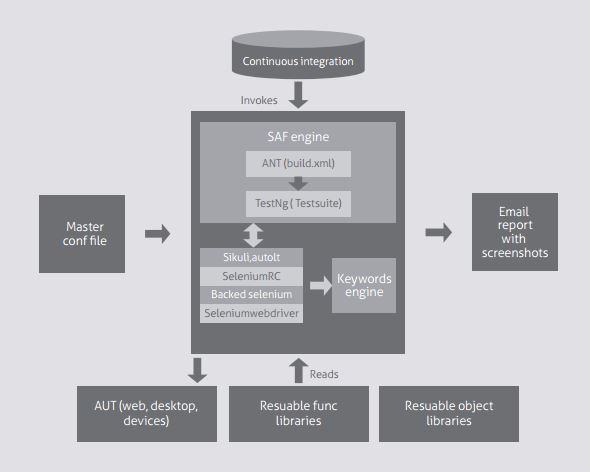
Selenium Automation Framework (SAF)

Quicker, more reliable test automation
Automation technologies improve test coverage and yield higher quality products. They save thousands of manual test execution hours, significantly reducing costs. SAF is a customized framework developed using Selenium, a widely accepted web application automation tool. It shrinks test cycle times and related costs. Selenium is a portable software testing framework for web applications. The tests can be written as HTML tables or coded in a number of popular programming languages. They can be run directly in most modern web browsers. Selenium can be deployed on Windows, Linux and Macintosh.
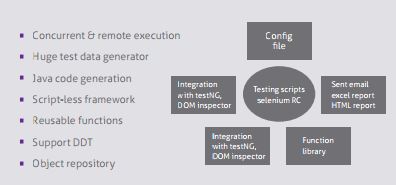
SAF framework
SAF increases automation efficiency by minimizing initial coding effort. It is a script-less framework used for test automation of web applications that are developed on .Net, Java / J2EE, AJAX. The framework provides a platform to implement data driven and Hybrid – keyword + data driven – framework by spreadsheet template. It can be used in your current automation project. SAF helps enterprises speed up testing using accelerators at the test design layer while keeping the automation suite flexible to interface with commercial tools, whenever needed. The test framework provides a comprehensive reporting dashboard for managing tests.
Test Automation process
Key features
Intuitive, user-friendly interface for creation and execution of test suites
Robust, flexible and extensible framework and support test automation on diverse sets of web applications across domains
Programmatic generation of functional test cases and test suites
Integration for dynamic and flexible grouping of test suites
Schedulers for test execution and test report mailing
Enables users to perform functional, acceptance and compatibility testing for most web applications
Automated HTML report generation and emailing of the same to all stake holders
Detailed test execution results with consolidated summary and error snapshots
Supports concurrent-related bugs detection
Faster execution with Webdriver; provides a Hudson plug-in to perform in a continuous integration (CI) environment
Supports UI automation with Sikuli
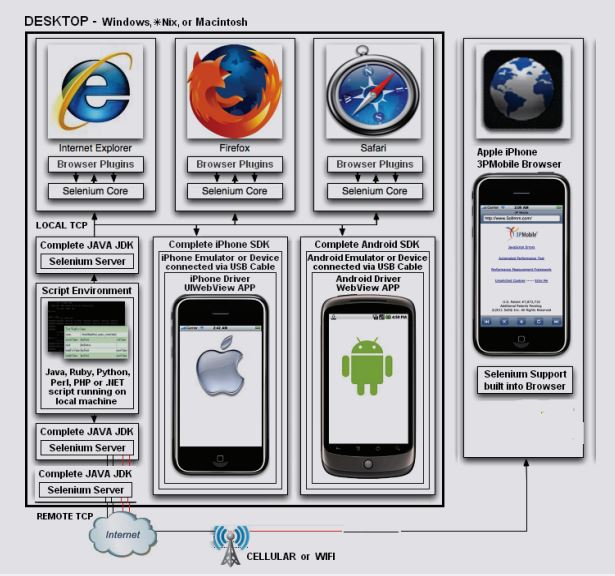
Manages multiple execution VM environments to run the tests against a vast combination of browsers / OS
Script execution, logging defect and tracking from QC
Support for sequential and concurrent execution on various browsers
Mobile web application automation on Android devices
Selective test script generation for expert view, keyword view, and many more
Reduced time-to-market
Utilities for handheld device automation, SAF script generation, PDF reports
Key benefits
Built on open source tools / libraries / frameworks to reduce overall costs for customers
Increases flexibility of time and resources Avoid redundancy on test execution
Increases test coverage to enhance the quality and reliability of the end product
Enables quick updates and shorter learning curve due to our high interaction with Selenium user community
Selenium -Open Source Test Automation: An Overview
Introduction
Within the software industry, once a product reaches the stable manual testing phase, every organization usually thinks of automated testing to save on the costs involved in manual testing. Since testing cost is an important factor for any project, organizations have started preferring open source test automation tools (which have reached a stage where they now rival the commercial ones) instead of investing in costly commercial testing tools. With no licensing costs, open source automation testing tools provide competitive features for automating the testing of software applications as well as Web portals.
A variety of open source automation testing tools is available for almost all types of testing such as functional, Web, UAT, regression, performance etc. Because of the extent to which these open source tools have matured, it’s time to think about them and have them in your QA automation kit. There are also various open source tools available to support the different testing types such as White Box Testing (Unit Testing, for e.g., using JUnit) and Black Box Testing (system/regression testing, for e.g., using Selenium, Sahi, Watir, TestMaker, LogiTest, TestGen4J, FitNesse etc).
The scope of this blog is to cover the basic flow for one of these open source Web testing automation tools – Selenium.
Why Selenium?
Selenium is probably the best option for automated testing of Websites today. It is becoming increasingly popular and it is the first choice of automation testers as well as organizations for automating the testing of Web-based applications for both the GUI as well as the functionality. Selenium can also be used as a unit testing tool for JavaScript. We at Xoriant have been working on Selenium for automating the testing of Web sites developed using AJAX for the pharmaceuticals and travel industries. The following graph shows the popularity of Selenium along with other open source automation testing tools.

Selenium Test Package
Selenium is a package of various test components which consists of the following three major tools. Each one has a specific role in aiding the development of test automation for a Web application.
- Selenium IDE – A Firefox extension to record test cases and suites.
- Selenium RC – Used to run tests on different browsers and systems.
- Selenium Grid – Runs multiple instances of Selenium RC at once.
- Qualitia and Tellurium – A wrapper for the Selenium engine.
Selenium Modes:
Bases on the components Selenium has following three modes for executing the test cases and test suites:
- Record-Playback mode (Selenium IDE):
In this mode only Selenium IDE is used to record the test scenarios in terms of test cases in firefox. This is a great way to get started to writing tests and group them together to form the test suite. The recorded tests can be exported to many programming languages so that we can tweak them and put them in the testing framework. The test cases and test suites can be replayed back to check the verifications and validations or sent to Selenium RC or Grid for further tweaking.
- Selenium Remote Control (RC) Mode
In this mode Selenium starts multiple browsers (one at a time) and then runs the recorded test-cases which are saved in your language of choice. This helps to enhance the test cases with looping and programming techniques to cover all the required test scenarios and checks.
- Test Runner Mode
In this mode the test cases are recorded ad replayed in the form of HTML tables. This is just one more facility to execute the Selenium IDE as well as RC test cases. This helps to check the test results reports in better manner if not formatted already.
Testing AJAX with Selenium
Selenium IDE – Recording and updating a script
Selenium IDE is the FireFox Add-on provided by the Selenium group. This is very simple and easy to use add-on so that non-programmers can record and create the test scripts for automating web components. These automated test scripts are used as Selenium RC test cases by choosing the language code. i.e. Selenium IDE makes easier to create Selenium RC test cases. (Install Selenium IDE and Selenium RC from Selenium download page).
Selenium IDE is used for:
- Recording and updating the test cases or write them manually in table tab.
- Creating Test Suite by grouping the test cases under one group
- Exporting Test Cases/Suites the supported language and save for Selenium RC to enhance them
- Finding reference of every API and Selense commands
- Debugging test cases by toggling breakpoints through the commands
How commands generated in IDE for AJAX pages:
- Almost all of the web pages are developed with AJAX technology since web2.0 evolution. While recording the page elements, Selenium IDE locates the page elements/objects usingXPath/DOM/CSS. XPaths are found automatically, but you may have to update the specific elements in Xpath manually by looking into the source of the page to make them unique.Firebug is the helpful firefox Add-on for this purpose.
- Every command has maximum two arguments. The first is usually target element pointed by its ID, name, link, DOM, CSS or XPath and the second is the value to that target element if exists. The selenium IDE commands when saved in the programming language of our choice for selenium RC purpose are called as Selenese.
- The common commands are open, click, type, assert, verify. Commands beginning with ‘assert’ or ‘verify’ are for checks and verifications. If verify command is used and it fails, it fails the test case and continue to run the remaining tests. If assert command is used and it fails, the test case is aborted and stops to run the remaining tests.
- For synchronizing the flow of test execution Selenium has commands ending with ‘AndWait’, it tells Selenium to wait for the page to load after the action has been done. However, it fails when using AJAX calls. In this case you have to use ‘WaitFor’ commands.
Selenium IDE – Most commonly used commands
The following are the most commonly used commands in the Selenium IDE:
open: Opens a page using a URL.
click: Clicks the element/object on the page.
clickAndWait: Performs a click operation, and optionally waits for a new page to load.
verifyTitle: Verifies the expected title and continues to run if it fails.
assertTitle: Verifies an expected page title and stops the execution if it fails.
verifyTextPresent: Verifies that the expected text is present somewhere on the page.
verifyElementPresent: Verifies an expected UI element, as defined by its HTML tag.
verifyText: Verifies that the expected text and its corresponding HTML tag are present on the page.
waitForPageToLoad: Pauses execution until an expected new page loads.
waitForElementPresent:Pauses execution until an expected UI element, as defined by its HTML tag, is present on the page. Used with AJAX calls.
If you need a full reference of all Selenium commands, read the Selenium commands.
